
 FrameOS
The Raspberry Pi
Choose a Raspberry Pi, then flash either a prebuilt FrameOS SD image or stock Raspberry Pi OS Lite.
Check the device-specific instructions for your display - a few panels need extra steps.
Applies to all three ways of running FrameOS
A Raspberry Pi frame works standalone, with a self-hosted backend, or with FrameOS Cloud. Option 1 below covers all three; options 2 and 3 describe the backend's SSH and script installs (the cloud has its own install script for a stock OS).
Which Pi to choose?
- Raspberry Pi Zero 2 W - the sweet spot for e-ink frames. Four 64-bit cores, tiny, ~1 W of power, around $15-20. This is what most FrameOS frames run on.
- Raspberry Pi 5 / 4 - use these for fast HDMI/LCD output (up to 60 FPS) or when size doesn't matter. The Pi 5 and CM5 have their own SD image. Over HDMI the frame adopts the display's native mode on its own - plug in a 1080p or 4K screen and it renders at that resolution, with the status screen's fonts scaled to match; there's no width or height to type in.
- Raspberry Pi Zero W (v1), Pi 1, CM1 - a single 32-bit ARMv6 core. Slower, but supported all the way down, prebuilt SD image included.
Not a Pi person, or dreaming of a battery-powered frame? FrameOS also runs on the ESP32-S3 microcontroller, on Pico W boards, and with no hardware at all.
Option 1: prebuilt FrameOS SD image (recommended)
FrameOS ships purpose-built SD card images: a minimal Buildroot-based Linux that boots straight into FrameOS. No Raspberry Pi OS, no manual SSH setup, nothing to install afterwards.
There are three, one per board family - each covers every board in its family, so you match a family rather than an exact model:
| Image | Boards |
|---|---|
raspberry-pi-64 | Zero 2 W, Pi 3, Pi 4, CM3/CM4 |
raspberry-pi-5 | Pi 5, CM5 |
raspberry-pi-32 | Zero, Zero W, Pi 1, CM1 (32-bit ARMv6) |
You can get an image three ways:
- Generate it in the backend: when you add a new frame, choose Download SD card. Pick your board, and the image comes out preconfigured with your WiFi credentials, timezone, display driver and frame settings - flash it, insert, done. Whether root login is enabled, with which password and which SSH keys, is an explicit choice on that screen.
- Build it in FrameOS Cloud: the same, but the image is assembled in your browser and the frame enrolls with your cloud account on first boot.
- Download a generic image from the
latest release (look for
frameos-*-raspberry-pi-64-buildroot.img.gzand its siblings). On first boot the frame starts a WiFi hotspot calledFrameOS-Setup(passwordframe1234). Join it from your phone, enter your WiFi credentials, and the frame connects to your network. Generic images ship with FrameOS Remote switched off, since there is no backend for it to talk to yet; Adopt frame in the backend turns a running generic-image frame into a managed one and enables it. Or skip the backend altogether and run it as a standalone frame.
Flash the image with Raspberry Pi Imager ("Use custom
image"), balenaEtcher, or plain dd. The partitions expand to fill
your SD card on first boot.
On first boot an HDMI frame shows its progress on screen - "Checking network…", then "Network connected. Loading scenes…" - and any frame without scenes shows the FrameOS status screen: name, display and resolution, IP address, a live clock with its time zone, who manages it, the frame's URL and, once you press one, the last GPIO button.
SD-image frames can also upgrade themselves in place: the frame downloads a new release, verifies its signature against a key baked into the build, and swaps it in on the next reboot - no re-flashing, no SSH.
Option 2: stock Raspberry Pi OS Lite
If you prefer a standard OS underneath - or you want to run other things on the same Pi:
-
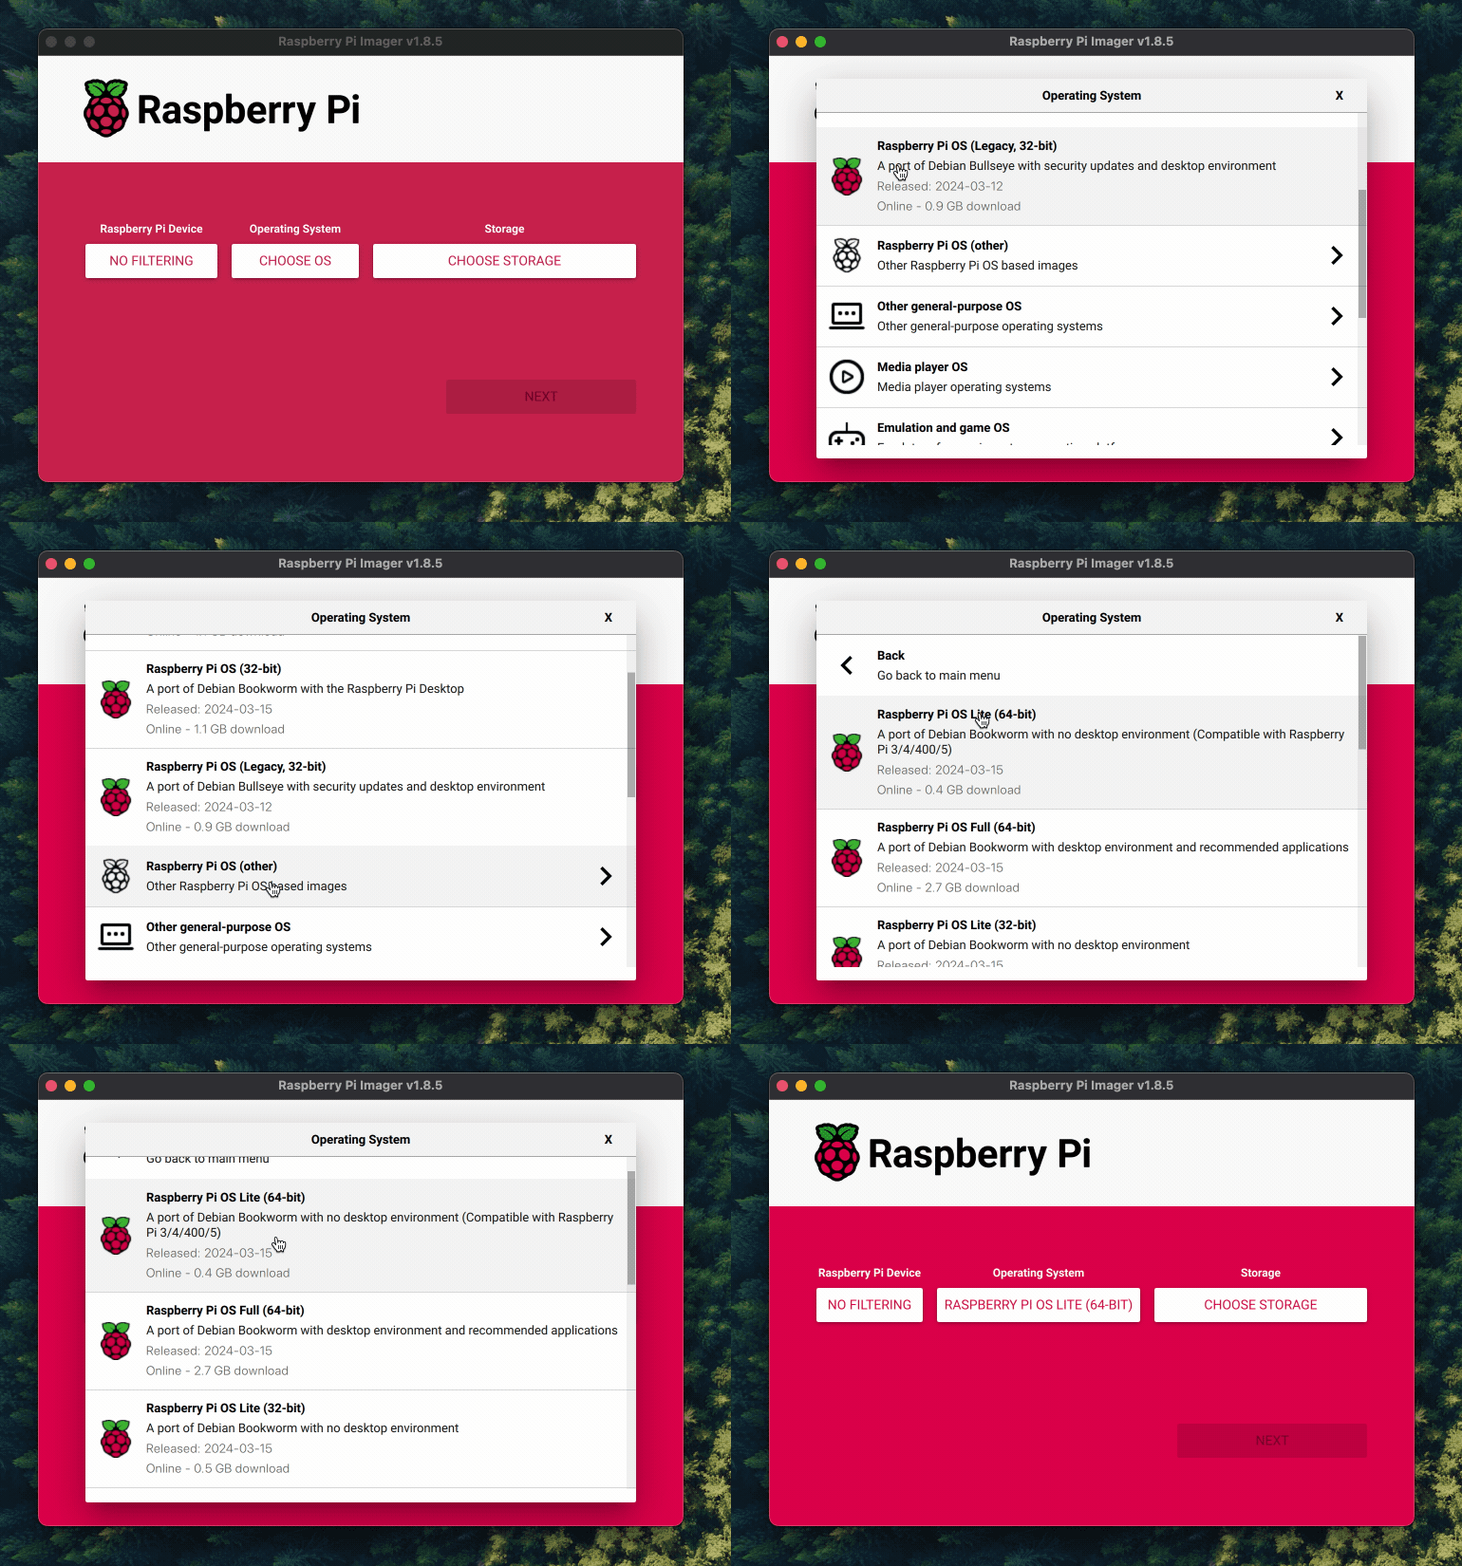
Download the Raspberry Pi Imager and pick the Lite version of Raspberry Pi OS (no desktop needed).
- 64-bit for Pi 3, 4, 5, Zero 2 W.
- 32-bit for Pi 1, 2 and the original Zero W.
-
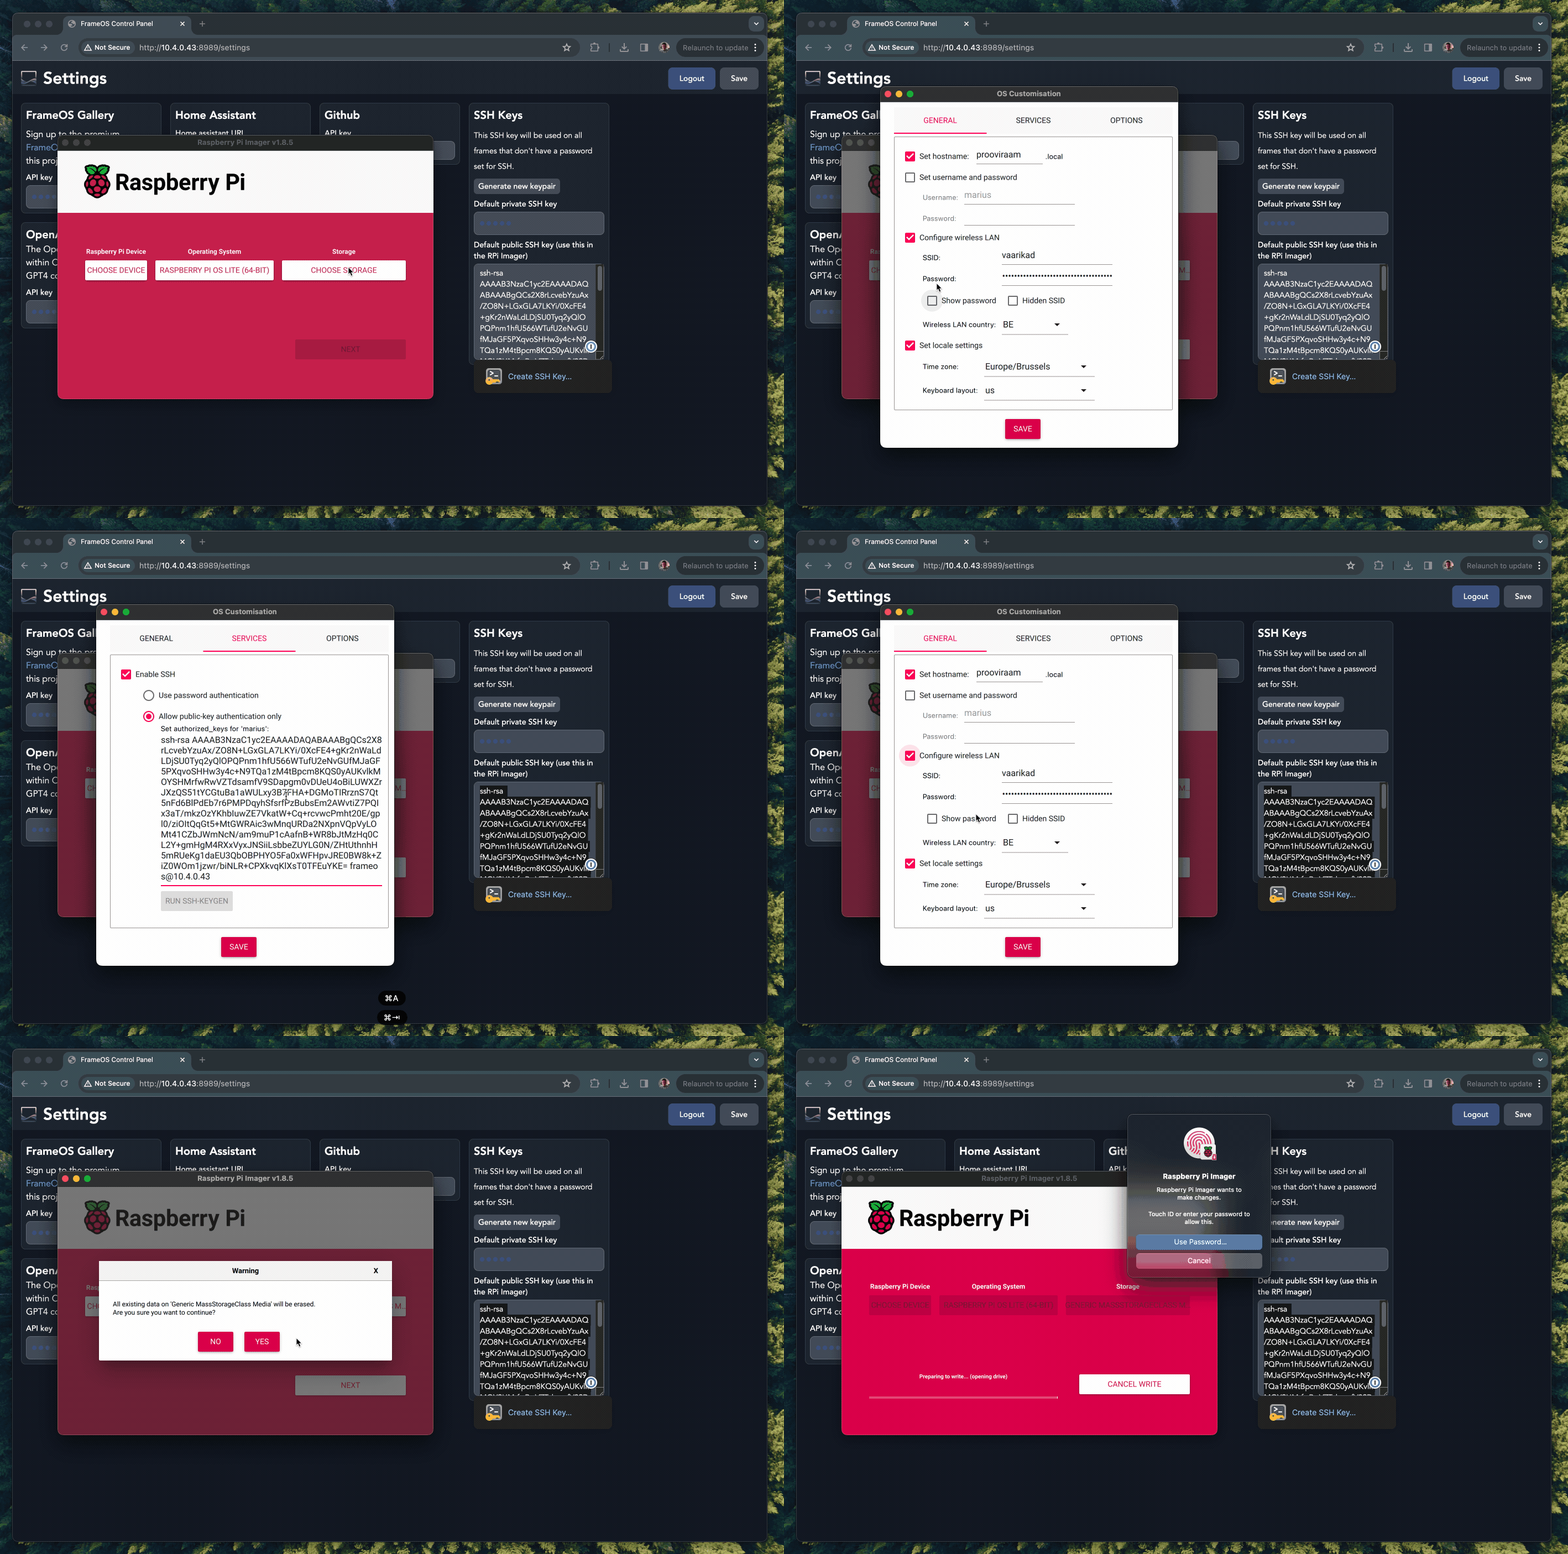
When prompted, edit the OS customisation settings: set a hostname, your WiFi credentials, and enable SSH. Use a password, or better, generate an SSH keypair and paste the public key.
-
Write the card, insert it into the Pi, connect the display, and power up.
-
Wait for the Pi to appear on your network, then verify you can reach it:
ping frame.local # or check your router's client list for the IP ssh pi@frame.local -
Once connected, bring the OS up to date:
sudo apt update -y && sudo apt upgrade -y
That's all. Given SSH access, the FrameOS backend does the rest - including installing dependencies and (for most targets) deploying precompiled binaries, so there's no slow on-device compilation.
Option 3: no SSH? install with a script
When the backend can't reach the Pi over SSH - a locked-down machine, a different network, a device you only have a keyboard on - add the frame with Install with a script. The backend hands you a single command to paste on the device. It installs FrameOS, starts FrameOS Remote, and the frame connects back to the backend over an outbound WebSocket. Deploys, logs, metrics and the terminal all work from there without an inbound route.
Changing the display from the command line
The FrameOS binary has a small CLI for the occasions when you have SSH but no web UI - switching
panels on a generic image, say. set-display patches the device and optional size, rotation, VCOM
and upload URL into frame.json, and driver-setup applies any OS-level changes the new driver
needs:
cd /srv/frameos/current
./frameos set-display --device=waveshare.EPD_7in5_V2 --rotate=180
./frameos driver-setup
Next step
FrameOS Cloud
Manage frames from cloud.frameos.net without running a backend - enroll a Pi or ESP32 in minutes, assign scenes from the store, see logs and previews. Free while in beta.
The ESP32
Run FrameOS on an ESP32-S3 microcontroller - flash from the browser, render full scenes on-device, sleep on a battery, update over the air.